
How to use Kinesiology Taping for Shoulder Subluxation
Filed under Treatments
How to us Kinesiology Tape for Shoulder Subluxation
By: Tayler Roost
What is shoulder subluxation?
Shoulder subluxation is a dislocation of the glenohumeral joint. This can be classified as traumatic, non-traumatic, or neurological. A traumatic shoulder subluxation can be caused by contact sports or repetitive shoulder movements. A non-traumatic shoulder subluxation can be caused indirectly by another injury such as a rotator cuff tear. A neurological shoulder subluxation can stem from diagnoses such as a stroke, spinal cord injury, or brachial plexus injury. Whatever the category of subluxation is, it affects the person’s ability to functionally use their arms, especially during lifting, flexing, and abducting their affected shoulder.
How to know when someone has shoulder subluxation?
The person will usually present with pain in the shoulder, loss of range of movement, and a palpable gap between the humeral head and the acromion. The subluxation is typically measured in finger width. Special tests can be completed as well to identify if there is a subluxation such as the load and shift test, apprehension test, and relocation test.
How to use kinesiology tape for subluxation support:
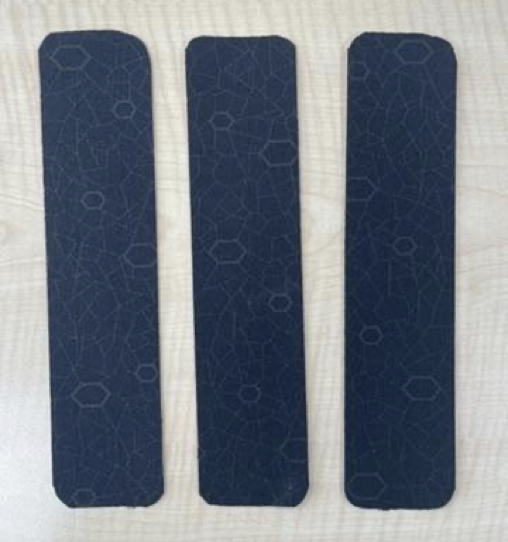
- Cut 3 strips of kinesiology tape into 6in-8in pieces with rounded corners
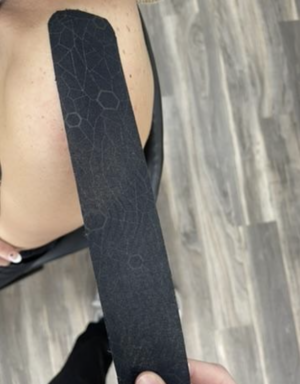
- Anchor at the top of the deltoid
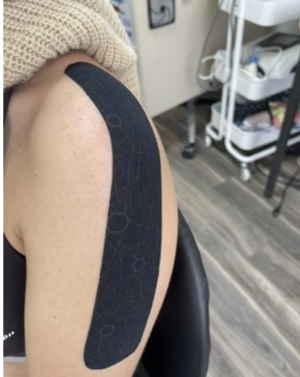
- Add a second piece, anchoring at mid-arm, stretching to approximately 30-50%, and attaching at the upper trapezius with shoulder approximated
- Add a third piece following the same steps as above anchoring at mid-arm, stretching to approximately 30-50%, and attaching at AC joint area with shoulder approximated
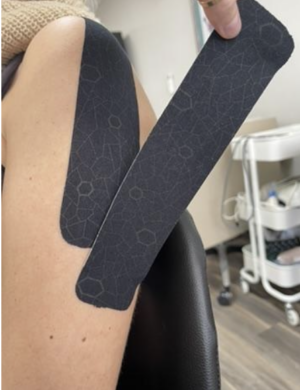

- Rub to adhere and they should be good to go! Ensure skin integrity and patient satisfaction after application.
Reference:
Chang, K., & Vitoonpong, T. (2023). Shoulder subluxation – statpearls – NCBI bookshelf.
National Library of Medicine. https://www.ncbi.nlm.nih.gov/books/NBK507847/
3 Comments
Leave a Comment
More To Read

Comparison of Erb’s Palsy and Klumpke’s Palsy: Symptoms, Presentation, and Treatment Options
What is the brachial plexus? The brachial plexus is a group of nerves originating from the cervical and thoracic nerve roots (from C5 to T1). The brachial plexus forms 5 peripheral nerves of the upper extremity, consisting of the musculocutaneous, median, radial, ulnar, and axillary nerves. This group of nerves supplies motor and sensory innervation…

All about kinesiology taping for upper extremity injuries and conditions!
All about kinesiology taping! Elastic is also known as k-tape, Kinesio-tape, and kinesiology taping. Elastic tape is all over the marketplace and is often seen on professional athletes. It can be found in most therapy clinics and is used to treat both orthopedic and neurological conditions. There are limited studies supporting the use of…

Splinting and Stretch Protocol for Pediatric Trigger Thumb
Tan, A. C., Lam, K. S., & Lee, E. H. (2002). The Treatment Outcome of Trigger Thumb in Children. Journal of Pediatric Orthopaedics B, 11(3), 256-259. The Skinny:Pediatric trigger thumb is a “relatively uncommon” condition of unknown origins. Studies have indicated that spontaneous recovery of trigger thumb is around 25-40%, and chances increase with age.…

The effects of cupping therapy as a new approach in the physiotherapeutic management of carpal tunnel syndrome
Article Review By: Rachel Reed Mohammadi, S., Roostayi, M. M., Naimi, S. S., & Baghban, A. A. (2019). The effects of cupping therapy as a new approach in the physiotherapeutic management of carpal tunnel syndrome. Physiotherapy research international : the journal for researchers and clinicians in physical therapy, 24(3), e1770. https://doi.org/10.1002/pri.1770 The Skinny: The purpose of this…

Sign-up to Get Updates Straight to Your Inbox!
Sign up with us and we will send you regular blog posts on everything hand therapy, notices every time we upload new videos and tutorials, along with handout, protocols, and other useful information.
This article on kinesiology taping for shoulder subluxation is very informative. I appreciate the detailed instructions and emphasis on proper assessment. The examples and videos provided make it easy to understand and implement. Thank you, Hand Therapy Academy, for this valuable resource!
Is there missing information for the first strip? All it says is anchor at deltoid but not sure if the strip is initially beginning in mid arm laying down distal to proximal direction. Thanks!
Hello. Thanks for reaching out you are going to anchor the firsts piece from the upper traps and than apply a stretch of around 30% over the deltoid. I hope this helps. Miiranda