
Finger orthoses can be tough, and the mallet orthosis is no exception in hand therapy. The protocol for 15 degrees of DIP extension with mallet fingers is tricky to manage while making a common mallet finger splint. Small splints on little fingers are also tricky to get sized just right and with strapping in the right places. Ask any experienced hand therapist and they’ll have an opinion on the issue. We all have our favorite version. But, no one splint is right in all situations.
“We are firm believers: There can be more than one right answer to the same question.”
We are going to take a look at a few of the available options and when you might choose to use them. After seeing some of the options here you can try some of them and decide which ones you prefer and maybe add a few to your repertoire. For each of these, we will assume a swan neck deformity isn’t a concern. This is a less common complication and will require that the orthosis includes slight PIP flexion with more proximal length.
Let’s get started!
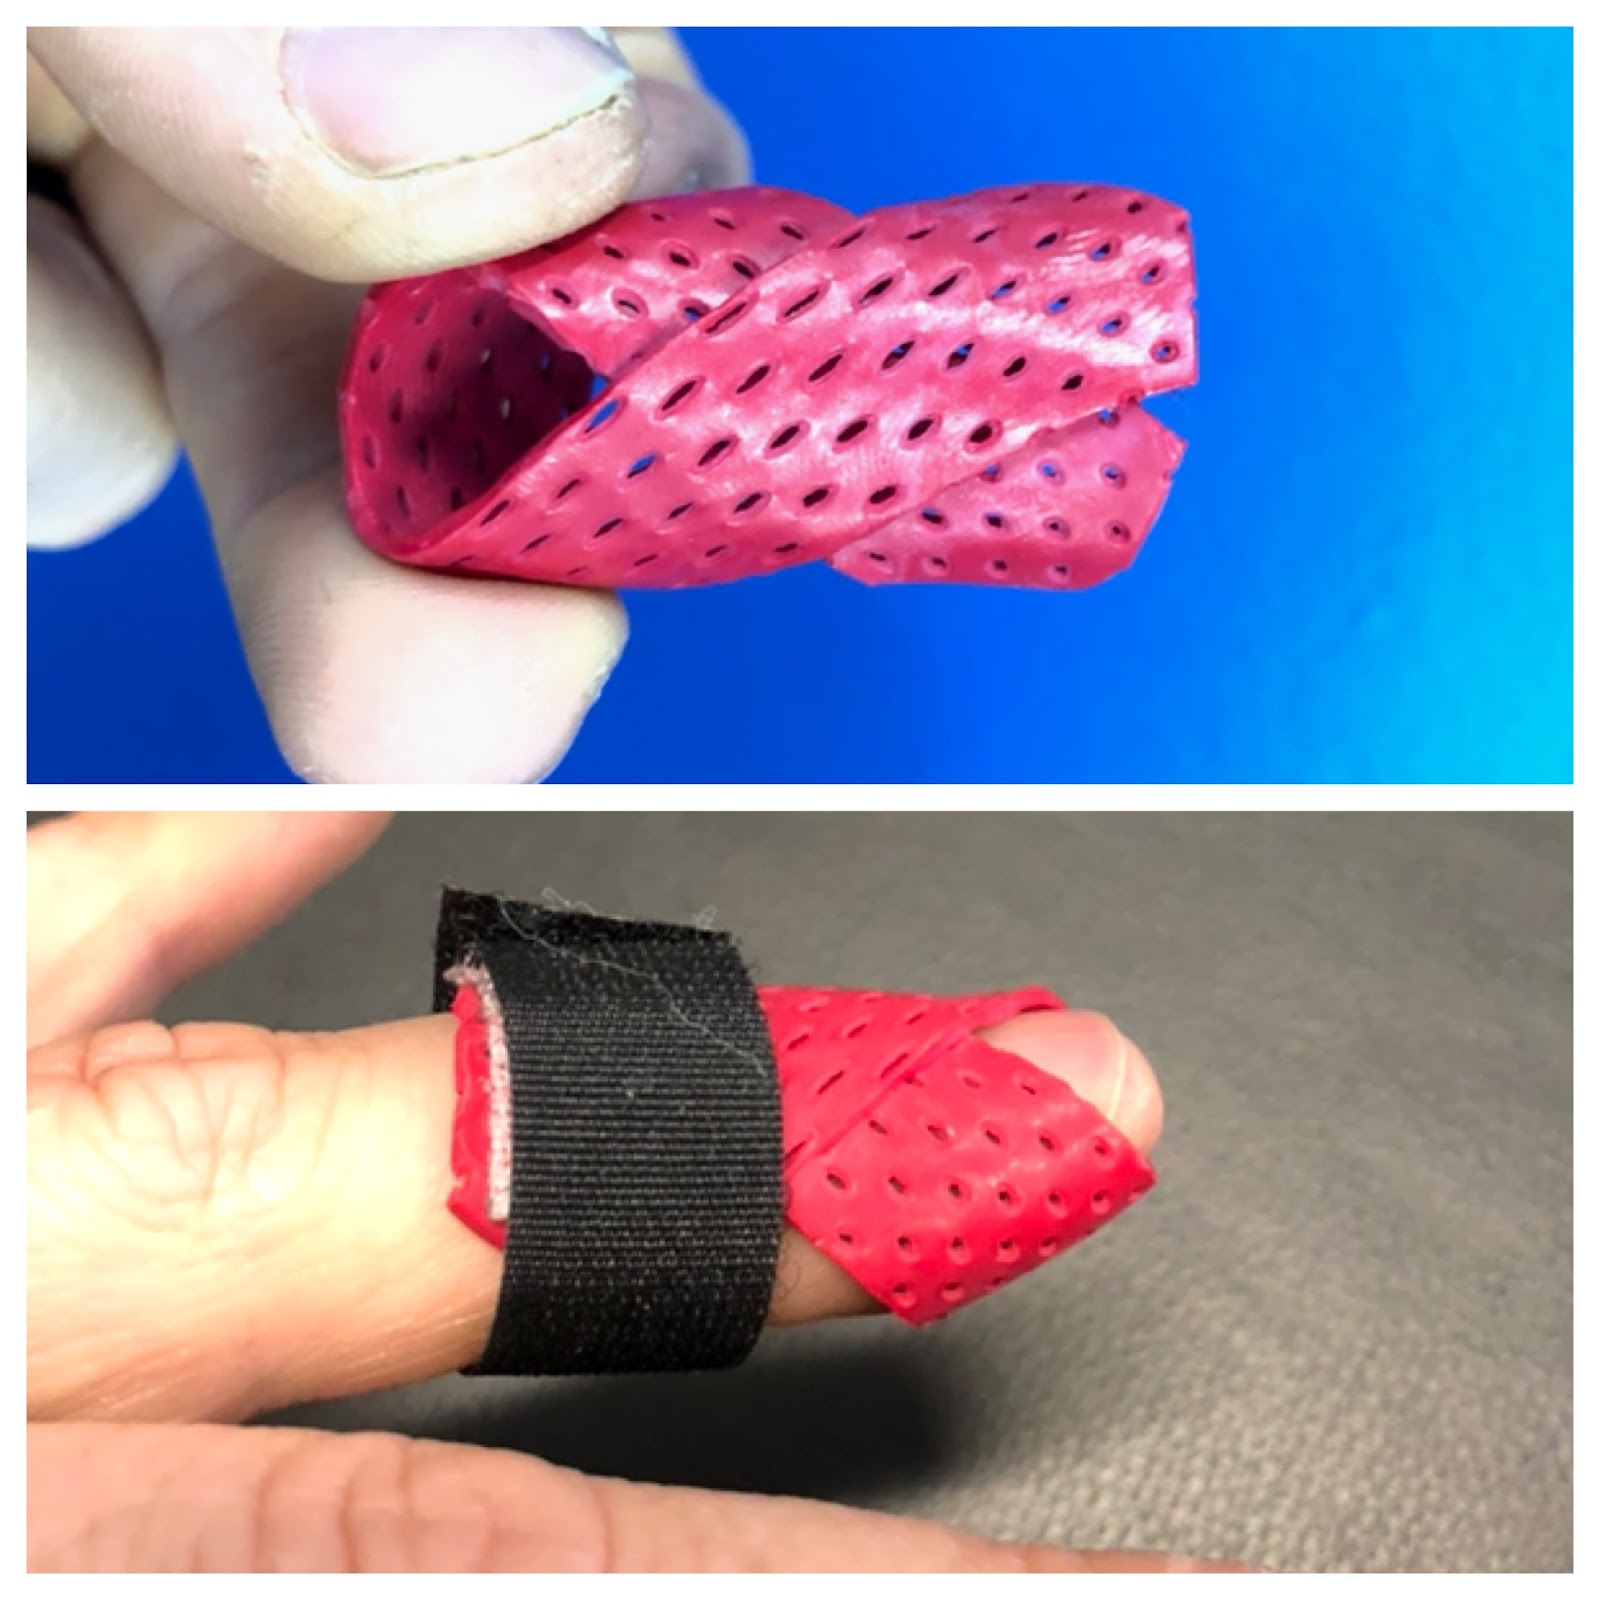
First – My preferred version is this ‘awareness ribbon’ shape. It is one of the fastest versions to fabricate and takes minimal trimming after initial fitting. I start with a 1/16 th inch piece of thermoplastic (I use aquaplast) that is roughly ½ an inch wide and 5 inches long. Starting dorsally, it wraps around the pad of the involved finger and back to the dorsum again. I use my 1st web-space to hold the distal IP joint in extension to avoid causing a flat spot over the pulp of the finger. Usually, a single strap around the second phalanx is enough to hold it securely. These are so quick to make, I often make 2 so the patient has one for showering and one for daytime use.
PROs – Faster fabrication, less material and can be more comfortable
CONs – Can be less secure for highly active patients
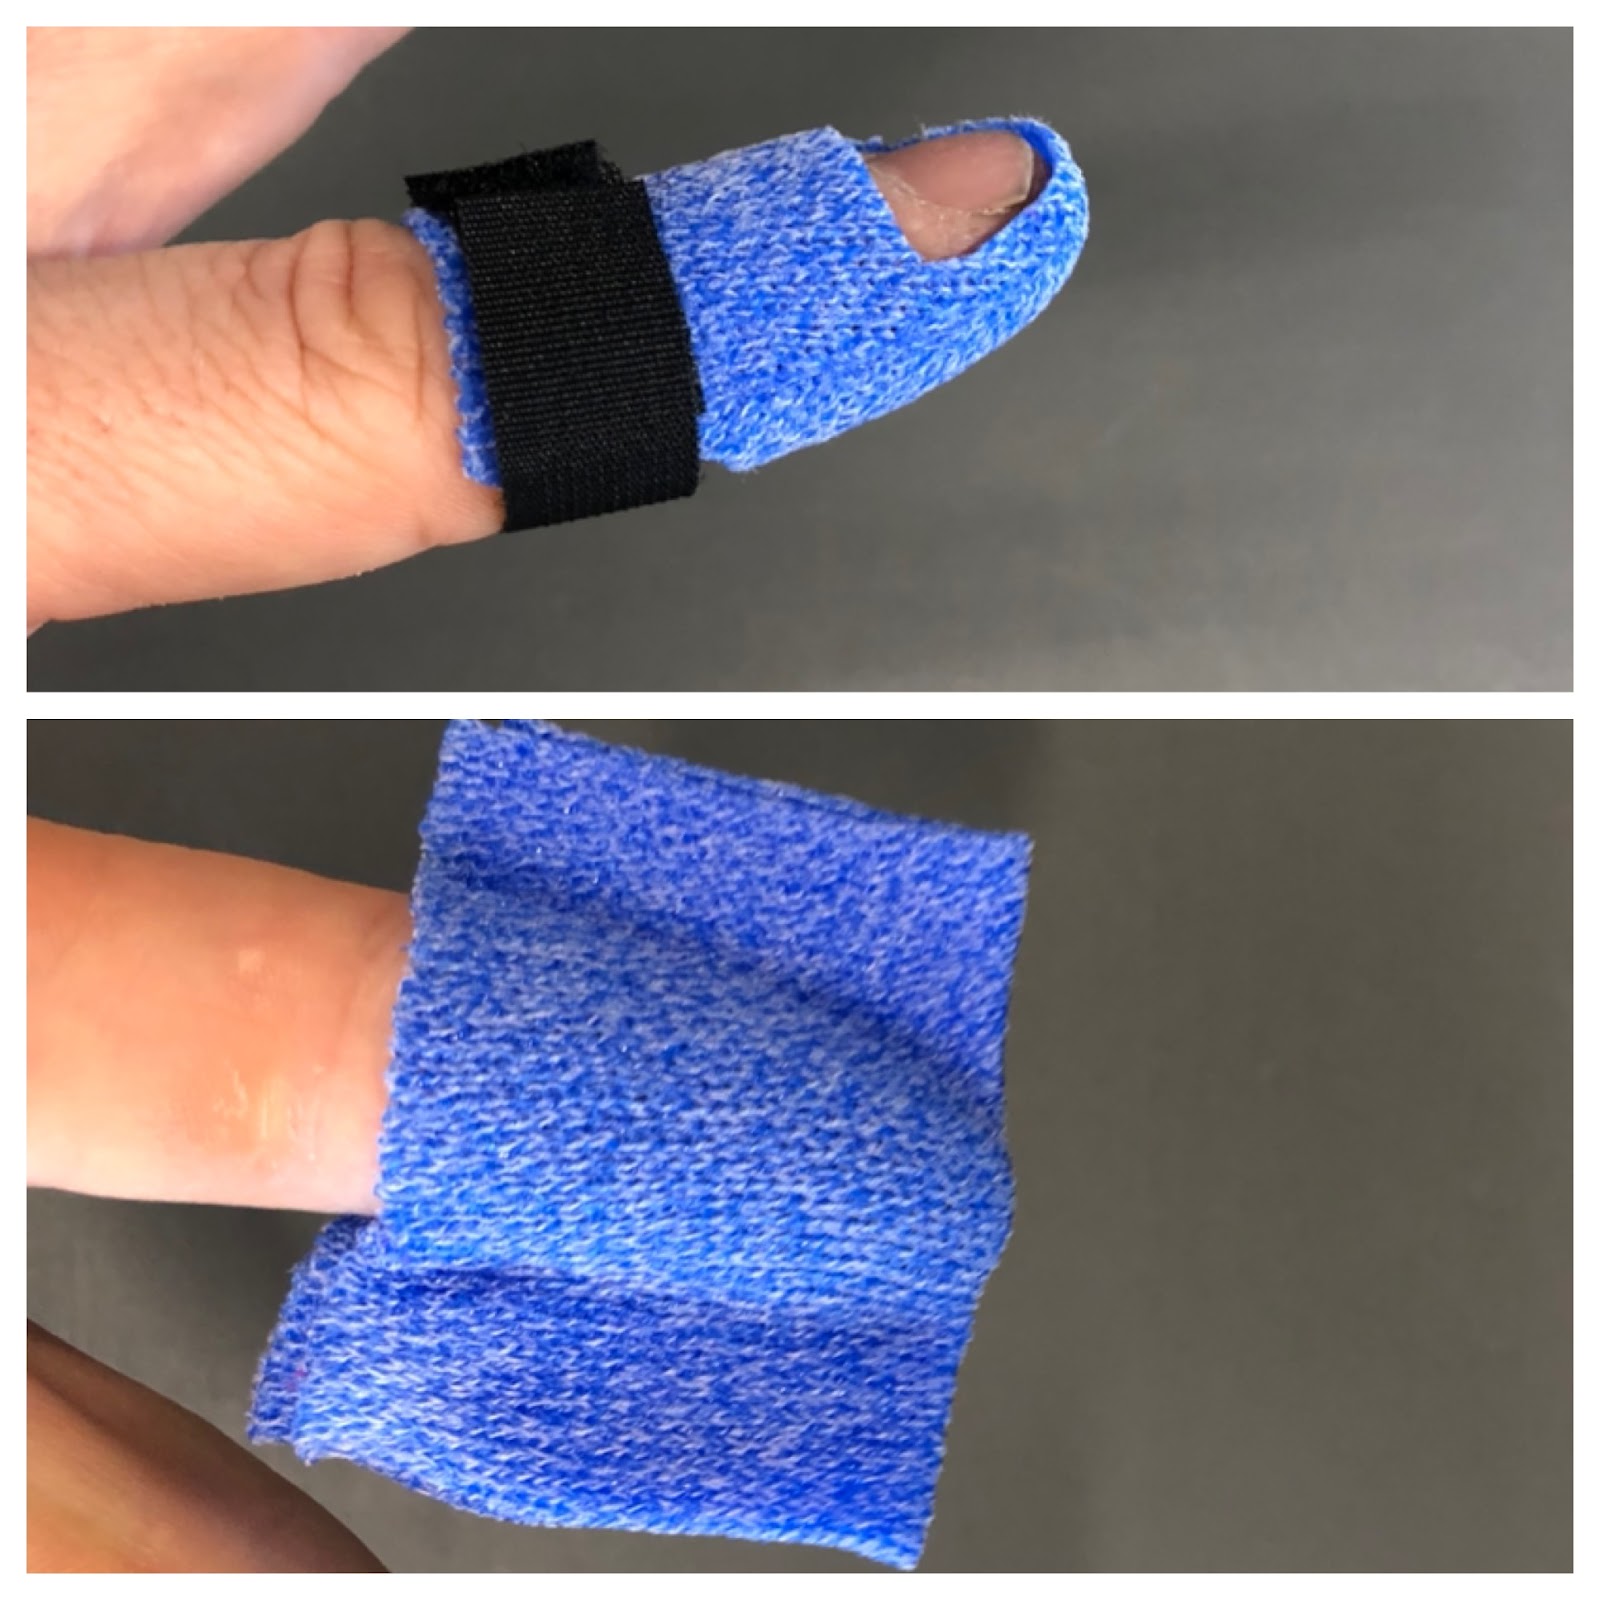
Second – The traditional Stax version is a common go-to splint for a lot of therapists (stack splints). It can take a little longer to fabricate but is very stable for more active or less compliant patients. There are probably 4-5 different ways to make this option and it can be made out of Orficast or thermoplastic. Regardless of material, one version starts with a 2-inch wide material and 5-inch long strip. If making it with orficast I’ll Use a 9-10” piece so I can fold it in half and double the thickness before fitting it.
Place the tip of the finger in the middle of the 5-inch length and fold it in half with ½ over the dorsal and ½ over the volar surfaces. Pinch it snugly on the radial and ulnar sides of the finger, then trim it closely while still warm to seal the edges of the material to each other. Again, keep that DIP in extension with the 1st web space until it cools.
Now, start by trimming to length proximally at the PIP volar crease and dorsally at the apex of the PIP. You’ll then need to trim out a dorsal opening over the nail and a proximal opening volaraly. This volar opening allows the strap to contact the skin around the second phalanx and get enough purchase to hold it on. That one strap around P2 holds it in place and keeps the DIP slight extended in the orthosis.
PROs – Typically more stable, many physician’s first choice
CONs – Longer fabrication time, more material required
Third- Here’s how to make a swan neck deformity splint
The volar gutter version works really well for patients with dorsal wounds. It is also a quick splint to make, but is slightly less stable for more active patients. I’ll keep it distal to the volar PIP crease in length unless a swan neck deformity is a concern.
Depending on finger girth, I usually use a piece of thermoplastic 2 inches wide x 3 inches long. I’ll start fitting by placing the proximal end just distal to the volar PIP crease. This means less trimming later if it isn’t too long when formed. Gently wrap it taught around the finger and lightly tag it on the dorsal midline of the digit. I’ll also light stretch it around the tip of the finger to give a smooth curvature without overstretching. Keep the DIP in slight extension as it cools.
I’ll trim it lengthwise at the radial and ulnar sides to be ½ circumferential. For this one I will place one strap on P2 and another on P3. If there are wounds dorsally it is important to either avoid those wounds or dress and pad them appropriately.
PROs – Good for working around dorsal wounds, faster fabrication
CONs – Can be less secure for highly active patients
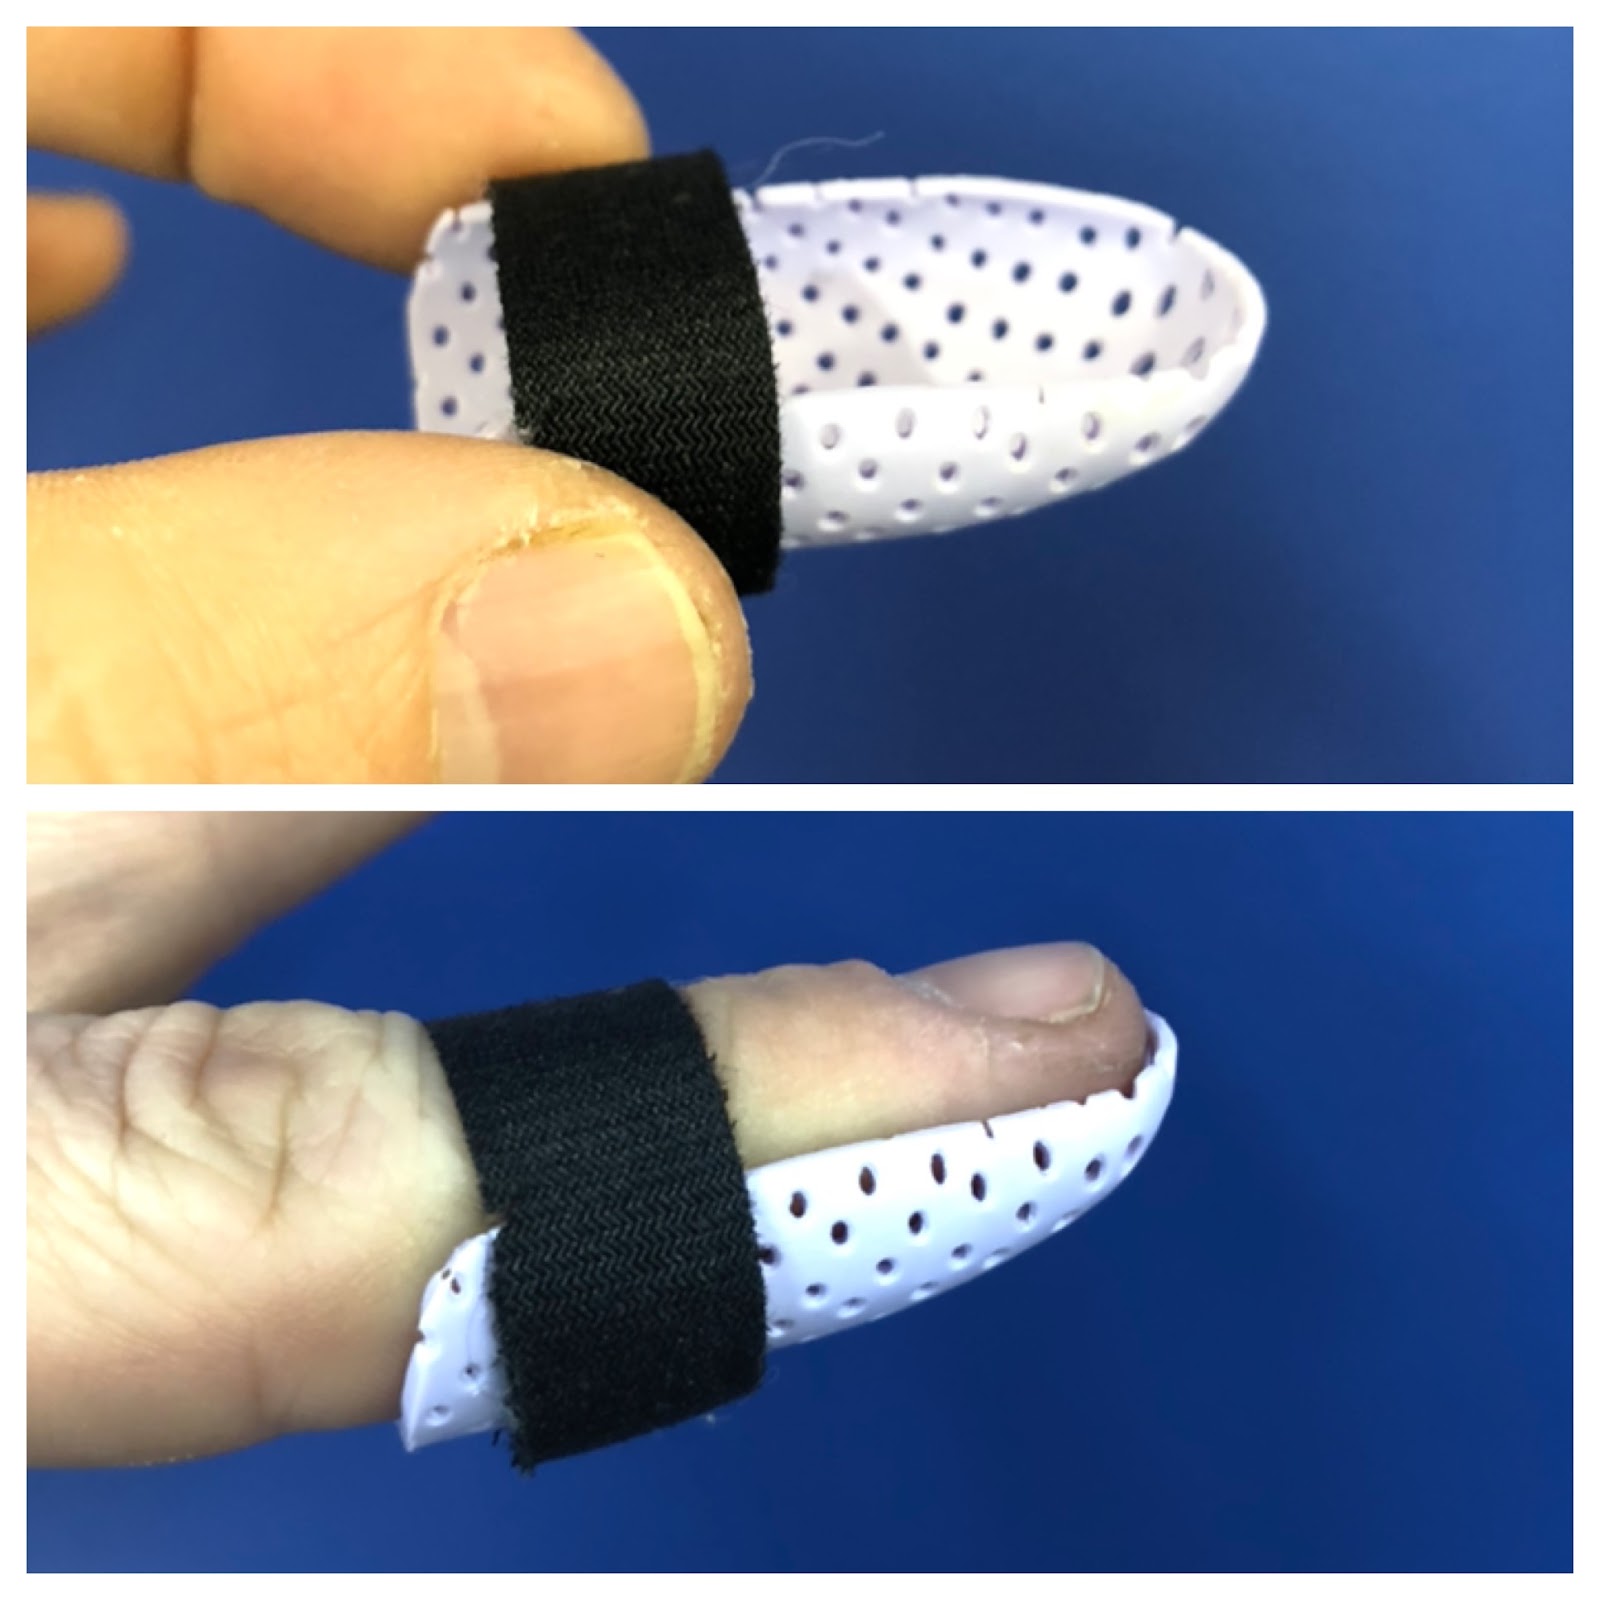
Fourth – The sugar tong option is another secure version that can provide more wound coverage while also being very stable. It has nearly full coverage, but stays on very well.
It starts like the custom stax splint but the trimming is different. I’ll pinch tight around the finger at the radial and ulnar sides. After holding the DIP in slight extension for it to cool I’ll remove and trim. For this version I’ll trim off the seams removing roughly ⅛ th wide worth of material. I’ll trim proximal length to just distal of the volar PIP crease and dorsal length at just distal to the PIP apex.
2 straps at roughly P2 and P3 are usually enough to hold this orthosis in place when applied snugly. With significant wound dressings or wounds that require more dispersed loads this splint is a great option. It’s near full coverage, however, makes it a bit less comfortable.
PROs – Can be good for fingers with lots of wound dressing, very secure.
CONs – May be less comfortable, won’t breathe well with so much coverage.
Fifth- The off-the-shelf stax is not a favorite of mine. I see a fair number of physicians send patients home with them and they rarely fit well and often need to be held on with adhesive tape. Repeated use of adhesives can cause skin problems and be generally unpleasant for the patient.
It is, however, an option we need to be aware of. This version is sized to the patient, like an oval-8, out of a sizing kit. If the patient has a wound on the involved finger and you are worried about cross contamination between patients you can fit it to the contralateral finger and estimate for edema.
This splint can be useful for patients who can’t tolerate the custom fabrication process or for patients with significant wound dressings when a custom fit orthosis would be less effective around large amounts of gauze.
PROs – Can be good for fingers with lots of wound dressing.
CONs – Poorly fitting for most patients
Bonus – Kinesion taping can be a helpful method for maintaining DIP extension, particularly during wound care and splint changes. There are a variety of different application options. The simplest is a volar-to-dorsal ‘I’ strip with no tension volarly and 15-25% tension dorsally to a tension-off anchor proximal to dorsal DIP apex.
While this dorsal tension can help hold the DIP in slight extension, I find that it is not usually enough support to replace a splint entirely. This type of tape can come off easily and without warning. That sets back the timeline entirely and causes significant problems.
If the patient struggles to demonstrate safe splint don and doff in the clinic or appears to struggle with compliance, this can be a very helpful option. It is not, however, feasible with volar or dorsal wounds as tape is contraindicated in these cases.
There is More Than Just 1 Right Answer
For each of these options there are pluses and minuses. We are firm believers that many questions in therapy can have more than one solution. We all develop our preferred options and the version of this splint that seems to work best for our patients. It is important, however, to have other options available for when a tricky patient comes in and our first choice just doesn’t work.
What is your preferred option? Did we forget your favorite? Comment below to let us know what you think and why you like the version you use.
1 Comments
Leave a Comment
More To Read

Wound Healing in Hand Therapy
By: Maddie Mott Wound healing (healing hand therapy) involves a complex series of interactions between different cell types, cytokine mediators, and the extracellular matrix with its four basic stages including hemostasis, inflammation, proliferation, and remodeling (Mackay & Miller, 2003). Because successful wound healing requires adequate blood and nutrients to be supplied to the site of…
Read MorePrevention and Management of UE injuries in Modern Mass Production
Reference: Pitts, G., Custer, M., Foister, R. D., & Uhl, T. (2021). The hand therapist’s role in the prevention and management of upper extremity injuries in the modern mass production industrial setting. Journal of Hand Therapy, 34(2), 237–249. https://doi.org/10.1016/j.jht.2021.04.019 By: Kaylen Kallander The Skinny: This study included four case studies to determine the impact of…
Read More
INTEROSSEOUS MUSCLE TIGHTNESS TESTING
May 2012 No. 19 INTEROSSEOUS MUSCLE TIGHTNESS TESTING Judy Colditz, OT/L, CHT, FAOTA INTEROSSEOUS MUSCLE TIGHTNESS TESTING – ARE YOU DOING IT CORRECTLY? The common term “Intrinsic Tightness Testing” is a misnomer as it describes a maneuver specifically designed to test tightness of the interosseous muscles. The interosseous muscles are small, short-fibered muscles contained within…
Read More
Sign-up to Get Updates Straight to Your Inbox!
Sign up with us and we will send you regular blog posts on everything hand therapy, notices every time we upload new videos and tutorials, along with handout, protocols, and other useful information.
I’ll have to try your first method. I’m usually in a hurry but find that stack splints never work, so I go with the sugar tong method but much thicker. It usually does the job for me. If not I’ll reshape it. Oh and I’m always adding coban.