
By: Josh MacDonald
Fabricating a custom splint for a mallet finger injury is challenging. Fingers are tiny and they have small tolerances for errors and adjustments with custom splints. Making a splint for a mallet finger injury is probably the hardest type of finger splint for a therapist to make.
Treatment recommendations vary, with some suggesting 10-15 degrees of hyperextension of the distal interphalangeal joint and others suggesting neutral. When making a splint on a finger millimeters make a difference. Getting that splint to fit just right can frustrate even a seasoned therapist at times.
There are a lot of different ways to administer a conservative treatment plan for a mallet finger injury. And no one version is right for every patient. Hand Therapy Academy is a strong proponent of the idea that there is more than one right answer to most problems.
In this post, we are going to explore a variety of different, common options for the conservative management of a mallet finger. From custom to prefabricated. Each one has its strength and weaknesses and we’d encourage each therapist to try using different options depending on how the patient’s injury presents.
For each of these, we are going to work under the expectation that a swan neck deformity is not an issue. That would require maintaining the proximal interphalangeal joint in 30º of flexion in a splint with more proximal length.
Let’s get started!
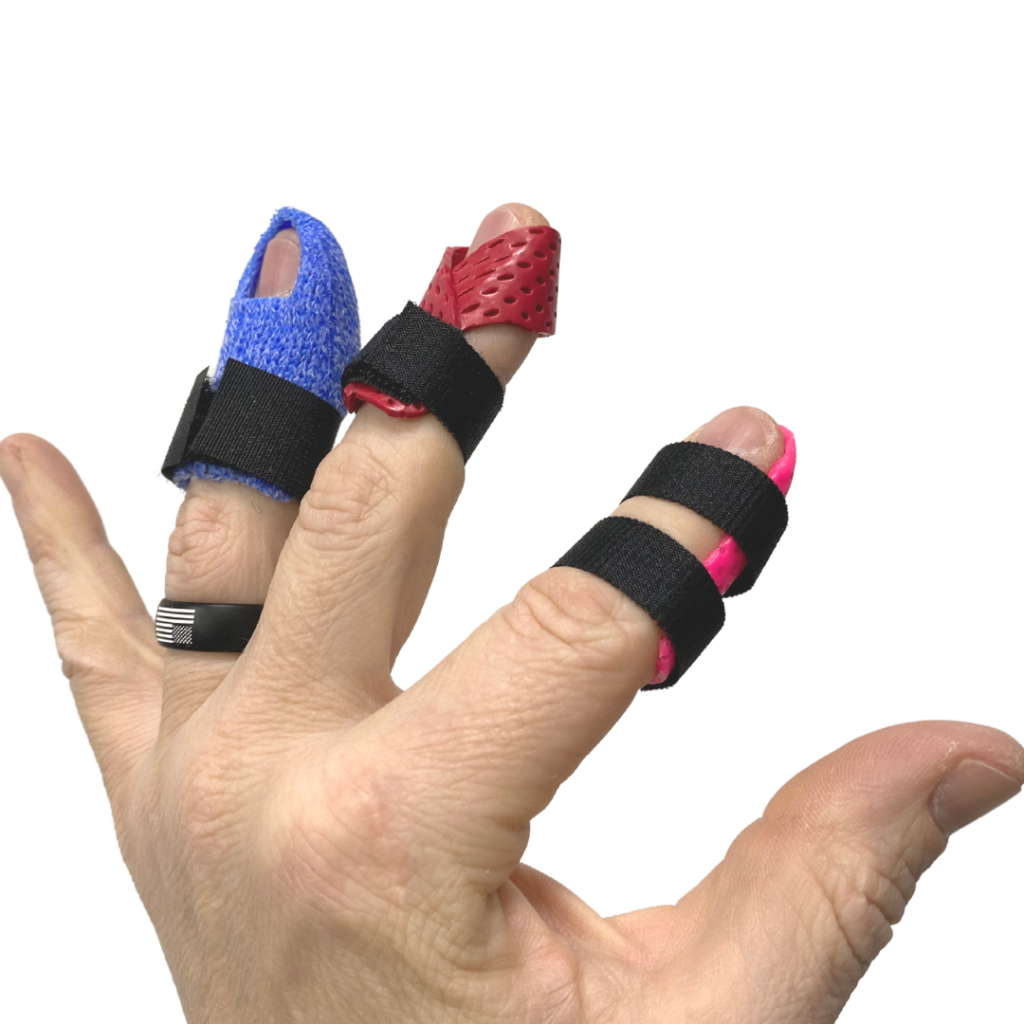
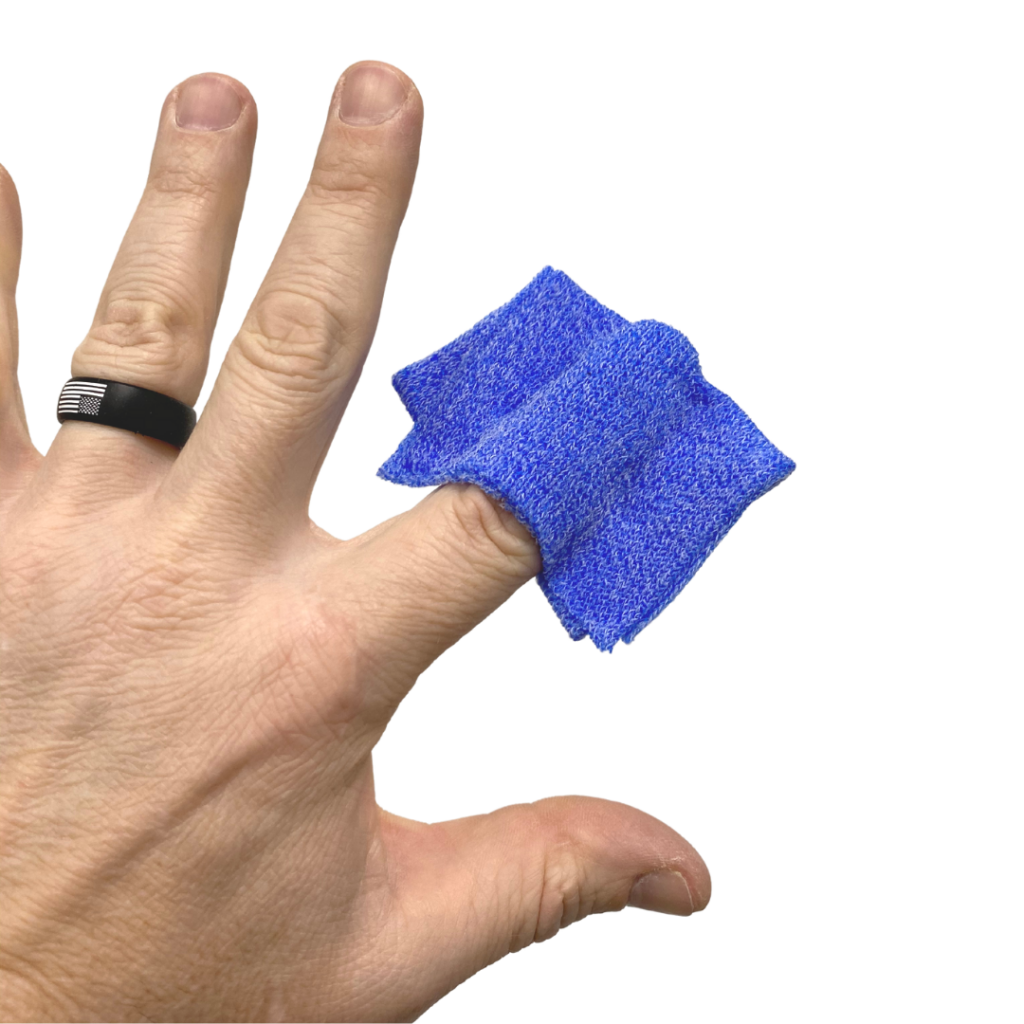
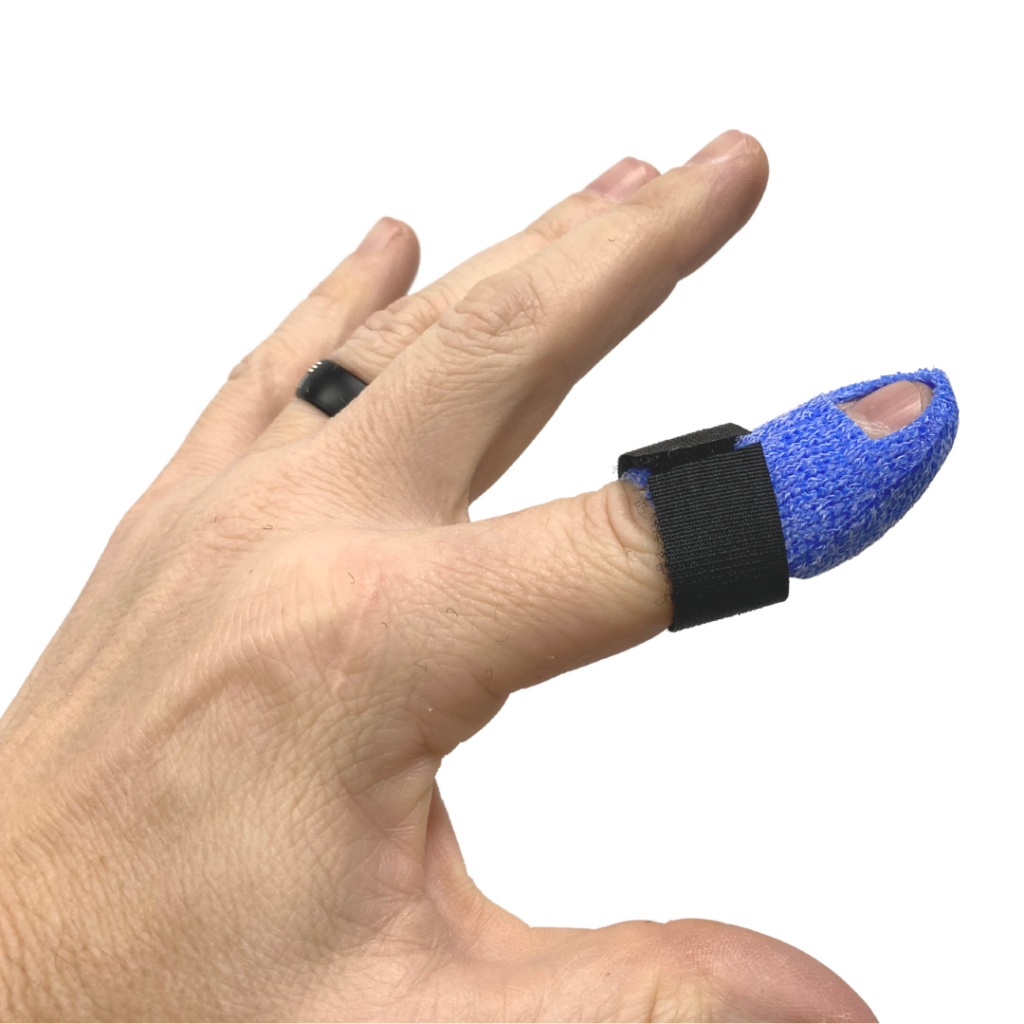
1st – Our go-to option is a figure-8 shape. This version is very quick to fabricate and usually requires little to no adjustments after fabrication. It does take some time to get used to making it, but once you become comfortable with it you might make it your first choice also.

Grab a scrap of 1/16th material. You’ll need something roughly 2/3rd the width of the distal phalanx and about 4+ inches long. A larger diameter finger will need more length.
With the patient’s palm face down, place the material on the proximal 2/3rds of the volar aspect of the distal phalanx at the middle of the length of the strip. Fold the left half of the strip around to the dorsal aspect of P2. Repeat with the right half of the strip so the two overlap at the middle to the proximal aspect of P2 dorsally. Press this junction together firmly. Now use the dorsal aspect of your 1st web space to gently lift the distal phalanx into neutral of slight hyperextension.
After it cools I’ll trim off any additional length proximal to PIP and any extra lateral material. With just one strap around the proximal P2, it has similar leverage to a typical Stax-style splint, but it’s much quicker to fabricate. We often make 2 for a patient in the same initial visit.
PROs – Quicker to fabricate, can be more comfortable, uses less total material
CONs – May be less stable on the finger for more active patients
2nd –
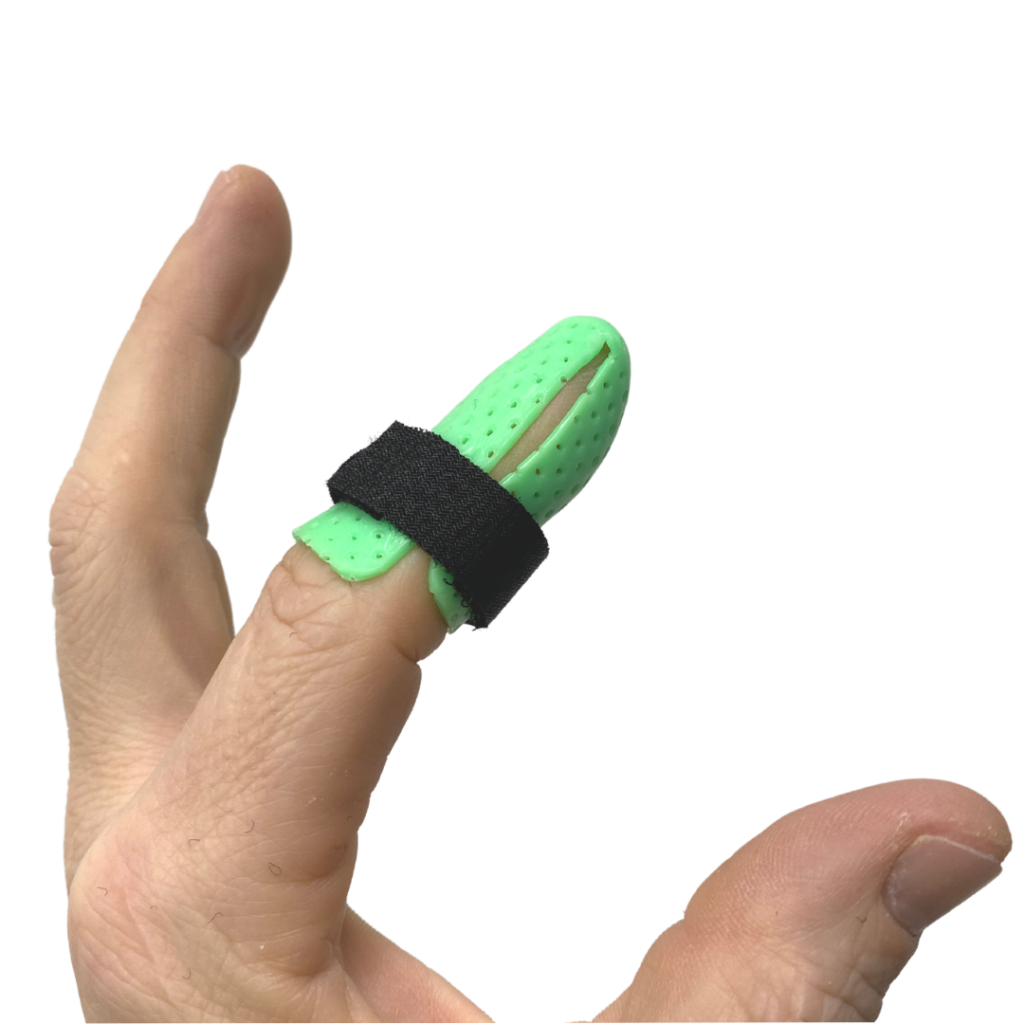
A more standard stax version is a go-to splint for many therapists.
This one can be made with Orficast or thermoplastic. A stax style may take a little more time to make but it might be more stable on the finger of an active patient.
There are several methods and templates for this type, but this is one version with Orficast. Start with an 8-9 length of 2-inch wide material.” I fold it in half to double the thickness before placing it on the patient.
One of the short ends of the material at the proximal aspect of the dorsal P2. Fold the 4-4.5 inch length of the material around the tip of the finger and over the volar aspects of the first and second phalanx. Pinch the radial and ulnar sides of the material firmly together with your nails to create a strong bond. Now trim the ulnar and radial excess off flush with the finger before the material cools. This will seal the edges at the cut line. Use your first web space’s dorsal aspect to keep the patients distal interphalangeal joint in neutral to slight hyperextension n as the material cools.
Finish by trimming out a hole at the nail to observe for blanching and skin integrity. Also, trim out 50% of the circumference of P2 on the volar aspect for the strap to be able to get purchase on the volar skin for security. This is where the only strap is attached, around proximal P2.
PROs – Usually more stable, many doctor’s preferences
CONs – More time to fabricate uses more material
3rd-
A volar gutter option is a good choice if your patient has wounds over the injury site. Strapping can be placed strategically to avoid wound sites. This option, however, can be a little less stable at times.
Start with a piece of material that is roughly three inches long by 2 inches wide. Place a long edge of the material on the proximal aspect of the second phalanx. Just distal to the volar crease of the proximal interphalangeal joint. Making this a clean edge means less trimming later. Wrap the radial and ulnar sides to the dorsum of the finger with only enough stretch to keep it taught on the finger. Pinch it together to hold in place. Lightly stretch the material around the tip of the digit also. but avoid overstretching. Again, keep the distal interphalangeal joint in neutral to slight hyperextension.
After cooling, trim the splint along the radial and ulnar sides at the 50% line to make it cover the volar half of the digit’s circumference. Place 1-2 straps to avoid any wound issues and ensure stability on the finger.
PROs – Relatively quick to make, good for avoiding dorsal wounds
CONs – May be less secure on the finger.
4th –
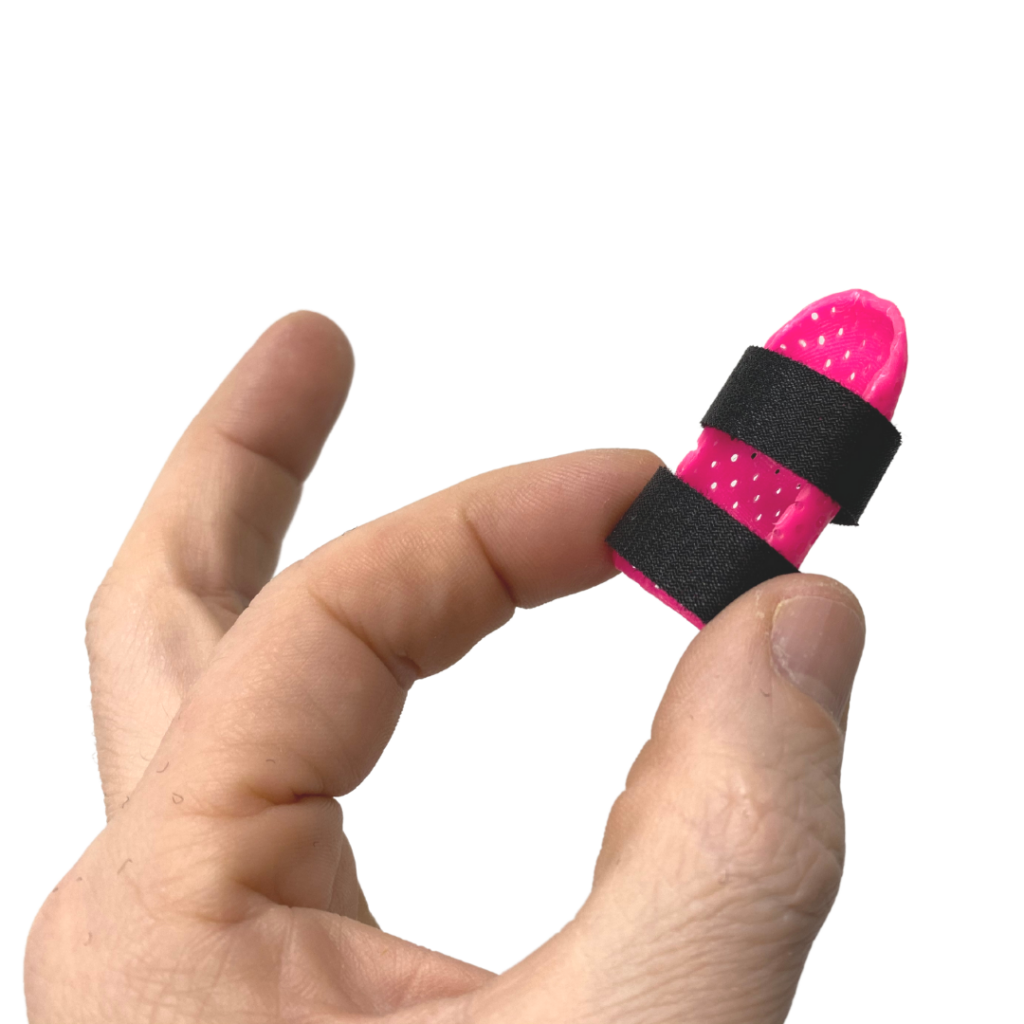
A sugar tong version will stay on very well, but with nearly full circumferential coverage moisture may be a concern for the skin.
This version starts just like our second option above, the custom Stax. Pinch tightly around the lateral borders of the finger at the radial and ulnar aspects. Hold that DIP into neutral to slight hyperextension as it cools. Then trip off the seams removing approximately an eighth of an inch such that the edges don’t touch it on the ulnar or radial sides. Make sure the volar proximal edge is free of the volar PIP crease and the proximal dorsal length is just short of the dorsal PIP joint.
Apply 2 straps at the proximal aspect and midway. This is a good choice if the digit has significant dressing bulk as it contains all of that well.
PROs – Secure over bulkier dressings.
CONs – Doesn’t breathe well. May trap moisture.
5th –
A prefabricated orthosis is an option for a few patients. It’s not our favorite as it doesn’t usually contour well and it can fall off easily. It typically needs to be held on with adhesive tape.
This may be a necessary choice for those that cannot tolerate the fabrication process. Or it may be necessary if paying out of pocket and they cannot afford the custom fabricated option.
PROs – Lower cost.
CONs – Poor fit for most.
Extra Option –
If a patient demonstrated poor compliance with wear and care, or if you are worried about the orthosis falling off, the use of stretch adhesive tape may be helpful. Brands like KT tape can be used to maintain light tension on the distal phalanx.
Used as either a simple ‘I’ strip dorsally, or a figure-8 pattern from volar pulp to the dorsum of P2, this can keep the joint in extension during orthosis changes or in lapses of compliance. The tape alone, however, is not sufficient to keep the Distal interphalangeal joint in extension. An orthosis is needed for primary security. Also, avoid taping over a wound as this will not allow the wound to heal.
Embrace the Variety of Options
Each option has its pros and cons. While we all have our favorites, each of these versions has its value and should be a tool in your toolbox for use with specific patients. If one of these is new to you, try it out. See if a new option might be an improvement on your current preference. Have fun and never stop trying new things.
10 Comments
Leave a Comment
More To Read

The Use of Neuromuscular Electrical Stimulation with Upper Extremity Paralysis
The Use of Neuromuscular Electrical Stimulation with Upper Extremity Paralysis By: Mikayla Murphy Martin, R., Johnston, K., & Sadowsky, C. (2012). Neuromuscular electrical stimulation–assisted grasp training and restoration of function in the tetraplegic hand: A case series. The American Journal of Occupational Therapy, 66(4), 471-477. https://doi.org/10.5014/ajot.2012.003004 The Skinny The purpose of the study was to…
A Review on the Conservative Management of Trigger Finger
Lunsford, D., Valdes, K., & Hengy, S. (2017). Conservative management of trigger finger: A systematic review. Journal of Hand Therapy, 32(2), 212-221. https://doi.org/10.1016/j.jht.2017.10.016 The Skinny The main purpose of the literature review was to determine the efficacy of conservative management of trigger finger (TF) through the use of an orthosis in addition to therapy. The review…

Conservative Therapy for OA in the Fingers: A Literature Review
Beasley, J., Ward, L., Knipper-Fisher, K., Hughes, K., Lunsford, D., & Leiras, C. (2018). Conservative therapeutic interventions for osteoarthritic finger joints: A systematic review. Journal of Hand Therapy, 32. 153-164. The Skinny – The article reviews the evidence on the effectiveness of conservative treatment for those who experience osteoarthritis in fingers and in their finger…

How Weather Changes Affect Joint Pain
By: Lucas Godwin How Weather Changes Affect Joint Pain Numerous potential factors can cause weather-related joint pain, including humidity, temperature, precipitation, and changes in barometric pressure. Scientists have performed many studies on joint pain and weather over the years, but so far, none can say for sure what the connection is. Timmermans et al., 2015…

Sign-up to Get Updates Straight to Your Inbox!
Sign up with us and we will send you regular blog posts on everything hand therapy, notices every time we upload new videos and tutorials, along with handout, protocols, and other useful information.
I have found more success with using tape for mallet splints as this ensures less slipping off that occurs with Velcro straps.
Also – my preference is the sugar tong splint however I tend to leave more skin showing on the lateral borders – to allow for taping against skin. If a mallet splint is unstable – or keeps coming off i will often suggest the patient wear Coban on top and anchoring the splint to the proximal phalanx – since it is flexible it does not interfere with PIP motion but ensures the splint stays on!
Those are great ideas as well! Getting them to stay on can be a challenge.
I agree!
One hundred percent agree. Had two splints made at PT, ended up removing the Velcro and I am now using tape. Works the best.
As an orthopedic provider it is important to avoid hyperextension as there can be a risk for dorsal skin breakdown due to decreased blood flow. Advantage with some hyperextension is less extensor lag post healing but one must be vigiliant at skin reassesment every couple of weeks.
Thank you for the very helpful splint fabrication instructions. My favorite to make is the figure-8, but I will now be more inclined to fabricate the stax style when indicated, after having read the fabrication instructions.
Great! We love sharing.
That is a great suggestions as well.
Will these work just as well for bony mallet finger? And where might a backwards Oval-8 ring splint fall in this stack-up if at all?
These will work for either type of Mallet injury. The only downside to an oval-8 is they slide off pretty easily but you could tape it on!